Wednesday, November 30, 2011

Advent with Paperwhites


One of my favorite holiday traditions is forcing bulbs. Paperwhites especially. The anticipation of the flower blossoms are a reminder of Advent and the anticipation of Christ's arrival on Christmas day. For less than a dollar a bulb it's a great and affordable way to brighten up a stairwell, mantel, windowsill and even a great hostess gift. The fragrance is intoxicating when they are in full bloom. 


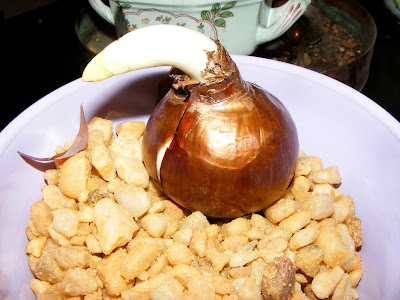
Each bulb looks like a little onion and the bottom is the part that has a rough surface. The top is obviously the little sprouting end. You will need bulbs, river rocks, or dirt, and a container.


You can use fancier rocks if you put the bulbs in glass. I love smooth river rocks in a clear glass vase but these simple river rocks were $6.00 and work perfectly.


Fill will rocks half way up the container. Place bulbs on the top of rocks.


Add more rocks half way up the bulb, filling the container as far as you can.


Fill with water about a half an inch up the bulb. You want to keep the roots wet.


Pick other cute containers and repeat. These little bulbs will grow in just about any small container. 


Just add water, wait, patiently and joyfully with anticipation.


One of my Episcopal priest pals on Facebook posted this quote about Advent this past Sunday:
‎"...In the orchestra pit, the violin bows are poised. The conductor has raised his baton. ...The extraordinary thing that is about to happen is matched only by the extraordinary moment just before it happens. Advent is the name of that moment.”
— Frederick Buechner, Whistling in the Dark
Sending you best wishes for patience and joyful waiting this Advent season. Wishing our darling Baby Nephew the happiest of first birthdays today. We can't wait to hug and squeeze you soon. 


Tuesday, November 29, 2011

Holiday Craft Gift Ideas


I love using my hands and being creative. I was an art major, a youth minister and have dreams of being an art teacher one day. When Hopsy at Monograms and Manicures encouraged us to be crafty this week and share our Do It Yourself (DIY) skills for gifts this season I jumped right onto the glitter train. I had just read my December Martha Stewart Living magazine and saw a star that would be perfect for my mother-in-law. It's Oh Holy Night in living color. These are the before photos of our Breezeway pre-Glitterama Star making began.


As a side note, I found these darling succulents at Home Depot for $3.00. I've been trying to stage this room for months and think it finally looks right. I think putting a small plant in a unique container also makes a great hostess gift. You can NOT kill these little guys either which is great for the green thumb challenged.


I bought this container for $1.00 at a garage sale, had the succulent vines growing in my garden and the larger succulent was also just $3.00 at Home Depot. Pretty cute for $4.00 don't you think?


It was wonderful having a few days off for Thanksgiving. Sunday we went to Annapolis and stopped into Michael's to get my DIY supplies. My husband didn't break out into hives either! He was so supportive and made sure we got the 40% off coupon. I'm crafty. He's thrifty.


I bought these enameled trays at least 14 years ago from Martha Stewart. It was one of the best purchases ever. I have four and use them for everything. Our turkey rested on them and they are also great for craft projects. I found a few fun other things and hope to make these snow globes soon as gifts. Once you open the crafty flood gates there is no stopping the flow of creativity.


Okay so for the Star of Bethlehem Star begin with a square sheet of card stock or watercolor paper.


The directions for this craft can be found here on Martha Stewart's site. It called for 20 inch stars made with watercolor paper. You can find this paper at craft stores and specialty art supply stores and have them cut it for you. I bought pre-cut sheets that were 12 inches only. 20 inch stars would make a dramatic difference. I'm just not sure where I would put such a beauty. So my foot long star will have to do.


Skip below to see the step-by-step directions. The next few photos are of the folds. You have to make sure that the points match up.


Once I got to this detail I had to punt. The height of the triangle was six inches. I made a mark at the three inch line and scored it to the skinny point of the triangle. (I hope that makes sense.)


Cut along the line and you will have one of your four point stars.


I recycled our old Christmas cards for the supports of the star. I cut them a bit differently but I think they will still work. You should bend them first to fit snug on the underside of the star.


This is the part where I should have used Kraft paper underneath the glitter action. I highly suggest you use Kraft paper underneath as a backup glitter catch that is easy to bend. The Solo cup is a great way to save the left over glitter. Worked like a charm.  


Spray your star (away from your body, clothes, sofas, etc.) with spray adhesive. Do not spray on top of your tray. Big mistake. :) 


I used Martha Stewart Crafts glitter in sterling. It's super pretty.


Let dry and repeat until all the points are covered on both stars.


The finished product will look like this. Hot glue gun both stars together and hang with a thick ribbon. 


Hot glitter mess! Stuck to the tray. How funny is that?


It was a messy but fun and fast little craft. I'm sure making a ton of little small stars would look so pretty on a tree or even hanging on a large wall. Definitely pick up some spray sealant as well. The glitter will go everywhere if you don't! You can give this as a gift to friends and match their tree decor. I think a creamy white with bronze ribbon would be gorgeous in my mother's home. My mother-in-law may get a pink star. The options are endless and Michael's has so many pretty glitter options. We are lucky that we live so close to the Maryland College Institute of Art (MICA) as there are a ton of art supply stores within a mile of Stone Hill!!!

For another craft I love doing every year, check out this Christmas Card Ball made with old cards. 

Hoping everyone gets a chance to use their hands this season to create something! I'm going to learn how to knit by the end of December! And I have even signed up for a sewing class that I hope happens. I do love to use my hands and see the start and finish of a project. Thanks again Hopsy for the fun idea. Can't wait to see what your other readers share!

Friday, November 25, 2011

Thanksgiving


Happy Thanksgiving from Baltimore!


Eric's turkey was perfect once again this year. We kept referencing last year's post for direction. We used the exact same recipe from Martha Stewart and it was better than ever!


We think this is the best way to cut the turkey once it has rested. Slice the breast off of the bone and cut thick slices. It keeps the heat this way too. My aunt would be very proud that all of the food was hot on the table today.


The dry brine is the key to the gorgeous bird and amazingly moist meat. E. chopped fresh thyme and used a half cup of Kosher salt to brine this baby. 


This year after the dry brine he wrapped it in a large plastic bag and then put it in the fridge overnight.


Then he prepared the herb butter for roasting. After the brine is wiped off you then add the butter mixture inside and out.


I was E's sous chef and chopped the apples, onion and got the lemons and butter ready.


E. did all the turkey heavy lifting!


My grandmother always says, "If you can read, you can cook." It is so true. I'm just so thankful my husband loves to cook. He basted every 30 minutes.


I made the cranberry sauce. This year with Port, peeled ginger and grapefruit zest.


I switched up the dressing and made it with corn bread, sausage and pecans.


We put the house together as best we could but did NOT polish the silver in time. 


Last week I prepared the firewood and kindling in case it was chilly enough for a fire. It was way too pretty and warm today for a fire however.


Our little porch is shaping up nicely after E. added the screens this summer. 


I added a fleece throw to cozy up with for cold mornings. I also found this great herb planter at Whole Foods. It has sage, rosemary and thyme.


The Whistler joined us on our last trip from Mom's house in Michigan. It works as a great front door stop and reminds me of my Grandmommy Nancy.


I switched up the Brussels Sprout recipe and added bacon for my Mother-in-Law. The pine nuts and bacon were crazy rich. Next year we are steaming broccoli!


We had a much smaller family gathering this year and a much smaller bird.


This allowed us to use all of our favorite wedding gifts and crystal and spend great time with Eric's parents and sister Kim. We always laugh and the joke of the day was that the kitchen was a "comment-free-zone"! 


We are thankful for another year of life. I'm especially thankful for our Baby Nephew. There truly is so much joy and hope in this child and I'm so thankful for Mac and Elise growing our family. 

For all of those who are not with us, we miss you and love you and are thankful for you.  We are thankful for the bounty of the feast we had today. We pray for the people who are left wanting. Thank you Lord for sending your son to die for our us so that we may have life. That is such good news. Amen!